The simple switch
A lot of beginners are intimidated by the number of electronic pins, and the different settings available, on an external flash which is what will be needed for high-speed photography. The fact is that it’s actually very easy to switch a flash and make equipment to do so. Our first image shows what you may need to start with. We have a basic external flash, optic triggers [not essential], and a pc cable.

The ‘optic trigger for sunlight’ is simply a normal optic trigger like the other two, which has a tube glued onto it so that it can work in bright sunlight. Without the tube the sun interferes with its trigger signal, you’re not likely to need this but it is included just to show that it is possible to use them in sunlight. A pc cable is not for plugging into your computer so don’t worry if you use a Mac and are wondering what you can use! ☺ “pc” stands for “prontor compur” whatever that is supposed to mean.
Look at the base of the flash, you can see 4 pins in the one shown, plus one that looks like a pin but is actually for locking the flash on the camera. You can ignore all but the centre pin. Any flash you get will have a centre pin, which is almost all you need. I say ‘almost’ because any flash will also need to use the earth pin, which any flash you get should have as well. Here is a close up view of the earth contact and the trigger contact.

And that’s about it, all you have to do is take a piece of wire and touch those two at the same time and the flash will fire! Easy as that [unless you haven’t turned it on of course!] Here is another image to illustrate how simple it is, my drawing includes a ‘switch’ of sorts but simply taking two wires and touching them together would make the flash fire.

Some high speed images involve two wires connected to two thin pieces of foil glued to either side of a piece of paper behind an apple or whatever the subject is. When a bullet or arrow [must be metal] goes through the foil it effectively joins the wires together, via the foil, and makes the flash fire - simple and cheap but very effective.
Now the flash I have shown here and the optic trigger have something in common, a PC socket. You only need one PC socket, either on the flash or the trigger because they both end up being joined to the earth and trigger pins of the flash.

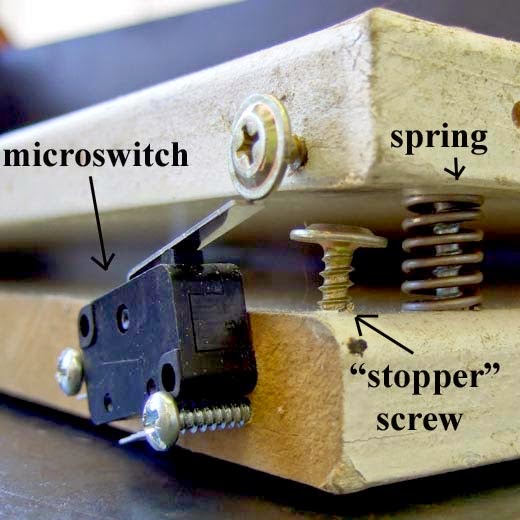
If you insert a PC cable into the PC socket [on the camera if it has one or an adapter if it doesn’t] you can cut one end off and you will now have two wires that will trigger the flash when touched together. This takes us to the basic switch setup. A micro-switch is a cheap and easy way to trigger the flash but takes a bit of skill to set up correctly. The board is hinged at one end. The spring keeps the board off the switch and the ‘stopper’ screw prevents it bouncing too much.
The switch has three contacts, “COM”, “NO” and “NC”. “COM” means “common” which is where one wire will always have to be connected. “NO” means “normally open” which is what you will most likely use, because this switch becomes ‘closed’ [joined] when it is pushed down. “NC” means, “normally closed” which you will seldom use because the contacts are normally joined until the switch is pushed and then they go open circuit, in other words it works backwards compared to the way we are all used to switches working. In the next picture we have a hotshoe adapter with a PC plug connecting it to a micro-switch.

If you mount the flash onto that hotshoe adapter, turn off the lights, place some objects on the board, and throw an orange you have your first high-speed image!

Fortunately it doesn’t end there. To start with you have a simple method of taking pictures that are very different to the average snapshot, but this method does have its limitations, as I’ll explain later.

The board has to be fine tuned so as not to do a double-bounce as demonstrated in the next image where it bounced up and came down with enough force to trigger the switch again, giving two exposures in one image. You can also see my badly chosen background in this image that could have been better if I had used the ‘blackground’ technique of shooting outdoors at night.

The safest way to avoid the double bounce involves a little more craftsmanship and a basic toggle switch that switches once and stays in place until it is reset. Just don’t smash another bulb without resetting that switch because it can involve a sudden increase in blood pressure when you realize you never had the flash firing when smashing your prize bulb, which was one of those rare extra-large models you scouted around for days on end to find for a special photo.

Once you set the switch in the up position, and have your flash charged and ready to fire, you can confidently hit the bulb, knowing that the flash will only fire once, like this!

And that’s as complicated as it needs to get if you just want to get started with some ‘smashing’ photos. With a little ingenuity all sorts of possibilities open up for someone wanting to experiment with high-speed photography, and moments of destruction.
No comments:
Post a Comment